How to Build a Chicken Coop
1. Prepare the Ground
You won’t want to build immediately after heavy rains, which will make the ground soft and porous and make it hard to lay a strong foundation. When you are ready to build, though, remove as many rocks and sticks from the ground as you can, and consider cutting back nearby shrubbery and large, overhanging branches. These can harbor predators and make it easier for them to attack your hens, as can nearby sheds, woodpiles, or other dark and shady hiding spots. Consider relocating or removing these as well.
2. Pick Your Plan
If you are building the coop from scratch, choose a plan that fits the considerations listed above. There are many accessible, easy-to-understand coop plans aimed at beginners readily available online, often for free.
3. Build Your Coop Frame
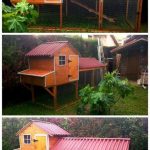
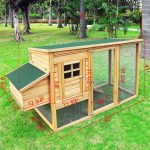
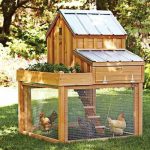
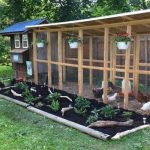
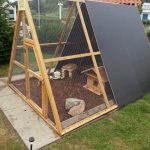
The chicken coop pictured above is a straightforward 4 feet by 6 feet. The plan will call for 18 pieces of plywood or “battens” to build out the frame, as well as 8 pieces for the angular roof. At a lumber store, you’ll be able to get all the plywood. If you take the measurements and plan with you, the store can often make the cuts for you, saving a lot of time and effort!
It is crucial that you do not rush the frame itself, as sacrificing quality for speed here will ultimately cost you time by creating problems down the line in your build. If your coop frame isn’t sturdy and secure, there’s no way the rest of your coop can be, either, and you run the risk of losing your birds to leaks, drafts, predators, or even coop collapse. We’re all for using cheap or second-hand materials, but if there is a place to splurge on quality lumber, it’s the frame. Double and triple-checking all your angles, measurements, and fastenings on the frame now will save you a lot of time and frustration later in the build, and ultimately result in a much stronger, safer coop.
We tend to paint all the exterior pieces first to protect from weather, and then screw the battens together afterwards.
4. Add Coop Walls
You’ll now add panels to the frame of the coop for walls (and two roof panels). Again, the plywood can be cut at the home improvement or lumber stores. The panels get securely fastened to the frame and lay flush along all of its edges, so there are no gaps to let in predators or drafts. This is also the time to cut your vents, which will be crucial for preventing respiratory diseases and heatstroke. Be sure to cover them with hardware mesh and to make sure any vents that are under the perches are closeable for winter.
5. Put in the Floor
Some plans will call for a dirt floor in your coop, and while this may seem easier, adding a wooden floor is well worth it in the long run because it will result in a much safer, drier coop. Your floor doesn’t have to be perfectly even, but it should be level, with well-secured boards that won’t rock back and forth. Ideally, choose wood that doesn’t have large knots or holes that could let predators in. Don’t forget to string hardware mesh under the floorboards as an additional protective measure against burrowers. The above plan includes sizing for a floor panel. After the side panels are fitted, you insert the floor panel, screwing it into the frame of the coop.


6. Add Your Doors
You’ll need two types of entrances to your coop, one for the birds and one for you. How high and wide your bird door will need to be depends on the breed(s) of chicken that you keep. Some chicken keepers build larger bird entrances and squeeze through them themselves; others like to make an entire wall removable so they can climb in and out with ease. The important thing for both entrances is to make sure they are accessible and can be closed securely to keep chickens in and predators out. For your hen entrance, you might consider adding the option to close it with hardware mesh instead of the wooden door, to add ventilation in the warm months.
7. Building Nesting Boxes and Perches
Chickens aren’t fussy about furniture, so all you’ll need here are nesting boxes and perches. nesting boxes are where your hens will lay their eggs; they can be any sort of box filled with soft bedding. Plan for one nesting box per three hens, or maybe more if you’re planning to keep a particularly broody breed. For perches, a 2×4 will do the trick, as long as it is higher than the nesting boxes, which will make it the most attractive place for your hens to sleep.
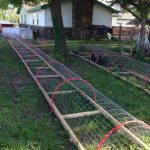
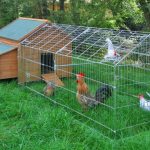
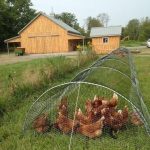
8. Build Your Run Frame
For the most part, the same principles apply here as we discussed in building the coop frame. However, the run frame will only have to support chicken wire, hardware mesh, and other fencing, not solid walls and a roof, so the frame won’t have to be quite as strong and perfect as the coop frame. It should still be well-constructed, though, as a solid frame will help keep your fencing secure and protect your birds from predators.
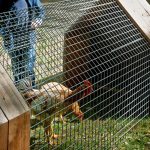
9. Add Your Run Fencing
You may have noticed we’ve mentioned hardware cloth or hardware mesh a lot more than chicken wire in this article. This is because hardware mesh is the fencing of choice to keep out predators. As we’ve mentioned before, chicken wire simply will not cut it; the holes are too large to keep out most ground-based predators. Hardware mesh is more expensive, though, so you can use chicken wire above three feet off the ground if necessary. Definitely use hardware mesh along the bottom and sink it at least six inches into the ground to keep out burrowers. There is no way a predator could get in unless they bring wire cutters with them. The cost of safety and protection can be high, but it’s worth it.
10. Accessorize the Coop
Waterers, available from farm suppliers, keep the chickens from fouling their water supply. Get one for every three or four chickens.
Also get a feed trough long enough to let all of the chickens feed at once (or get two smaller ones). Learn more about chicken feed.
Have enough wood shavings (pine) or straw to put a 6-inch layer on the floor and a couple of handfuls in each nest box and your chickens will have a perfect home. Change the bedding about once a month or if it starts looking flat.
With that, your first chicken coop should be ready to go! It’s good to do a last quality check, to make sure all of your construction is sturdy, your hardware mesh is secured, and your walls will keep out the weather and any animal interlopers. Regular maintenance and checks for warping or damage will also be crucial for keeping your coop as perfect as it was the day you built it. Remember that a well-built coop will save you a lot of time and money in the future by keeping your chickens safe, happy, and healthy.